Transfer Learning using Tensorflow's Object Detection API: detecting R2-D2 and BB-8
In this post, I’m going to train an object detector to locate R2-D2 and BB-8 in an image or video. All the files can be found on my GitHub repo. But let’s not wait and see some results!
What is Transfer Learning
Training an entire Convolutional Neural Network (ConvNet or CNN) from scratch is something that few people can afford. In order to accomplish such task, two elements are required in large amounts: data and computational power. The former is hard to get: huge and reliable datasets are normally the result of a joint effort between different people or research groups working together for an extended period of time. The latter could be very expensive (in terms of money or time) if a huge model needs to be trained.
For these reasons, what many people do is what is called transfer learning: use an already trained (also called pre-trained) network as the initialization point for their own model, or more specifically, use the weights of the pre-trained ConvNet as the starting weights of their own model. At this point, two options exist:
- Leave the net as it is, perhaps modifying and re-training only the last layer (the fully connected one). This is the easiest case where we can start making predictions right away (if we don’t even re-train the last layer). The demo in the Tensorflow repo covers this situation and it can be set up in a few minutes.
- Fine-tune the net. In this case, we re-train the weights of the ConvNet using regular backpropagation. Since the initial layers of a CNN tend to explain more primitive shapes, common to many different objects, we could choose to re-train only the higher layers and fix the lower ones (the ones closer to the input). For the same reason, this method is convenient if we want to detect different objects from the ones used to train the pre-trained ConvNet. Here, I will show you this process in order to detect R2-D2 and BB-8 from Star Wars in any image or video.
If you’re asking yourself “Why do you want to detect R2-D2 and BB-8 in a video?”, I guess the easiest answer would be “Why not?”. The experiment at hand is an engineering one or more colloquially a problem of How to put the pieces together. I wanted to try Tensorflow’s Object Detection API and make it work. My objective was not to achieve state-of-the-art scores. Therefore, I figured I’d use something cool that I like. So… Star Wars! Of course, you can collect your own images and detect whatever object you want.
Tensorflow’s Object Detection API
Some time ago, the Tensorflow team made available an Object Detection API that makes the process of fine-tuning a pre-trained model easier. In order to use the API, we only need to tweak some lines of code from the files already made available to us. Here, I won’t go into the details of the net architecture, the optimization algorithm used (the default will be RMSProp) or the several other hyper-parameters.
Following, I will list the main steps needed to build your own object detection model (it is assumed that you already followed the installation instructions for the API):
- Collect your images and annotate them (I used labelImg). Normally, you would want to have a few hundred images but it depends on the problem. I managed to gather a hundred for each class (R2-D2 and BB-8). They are probably too few and too similar based on the results obtained, but at least the model works as expected.
- Create TF Records using the file provided by the API. These files will be the input for the API. If your dataset (images and annotations) has an analogous format as the one of the Oxford-IIIT Pet Dataset, you shouldn’t have any trouble creating your TF Records. Tensorflow has also a helper code to create TF Records of the PASCAL VOC dataset. Otherwise, this step could be a bit tricky, since you should code the program by yourself. The command to run the script that creates the TF Records is the following (this is Windows code, so ^ just splits a long line and it’s analogous to \ in linux):
python create_sw_tf_record.py -- ^
label_map_path=D:/Python_projects/Detection/object_detection/data/sw_label_map.pbtxt -- ^
data_dir=D:/Python_projects/Detection --output_dir=D:/Python_projects/Detection/object_detection/data
Of course, you need to use your own path. I used the full path because I had troubles with the short ones (a Windows matter most likely).
- Download a pre-trained model from here. I chose the ssd_inception_v2_coco because it was fast and had a higher precision (mAP) than ssd_mobilenet_v1_coco, but you can use any other.
- Create a configuration file for the model that will be trained. You can choose from here the corresponding configuration file to your model. You only need to change the paths and the number of classes (num_classes: 2 in line 9). In my case there are just two.
- Train the model. You can use the following code from inside of the object detection directory of the API (that you should’ve clone previously while following the installation instructions):
python train.py --logtostderr --train_dir=D:/Python_projects/Detection/object_detection/data ^
--pipeline_config_path=D:/Python_projects/Detection/object_detection/data/ssd_inception_v2_pets.config
This step could last for hours to get to a stable training loss, depending on your GPU. I don’t know how long would it take on a CPU. A more rigorous study would require to check the loss function or our preferred metric on a validation set. However, since I couldn’t gather many images and this is just an experiment on the Tensorflow API, I won’t care here. You can check the evolution of your model using tensorboard. Open a new command prompt or terminal and write:
cd D:/Projects_python/Detection/object_detection
tensorboard --logdir=data
On Windows, if you pass the full or shortened path to logdir, you won’t see any results (at least it happened to me and this worked after a few tries).
- Export the frozen graph from the trained model. You just need to use the script provided by Tensorflow without any modifications. The code is:
python export_inference_graph.py --input_type image_tensor ^ --pipeline_config_path D:/Python_projects/Detection/object_detection/data/ssd_inception_v2_pets.config ^ --trained_checkpoint_prefix D:/Python_projects/Detection/object_detection/data/model.ckpt-5576 ^ --output_directory D:/Python_projects/Detection/sw_inference_graph - Try your model!. You can use this ipython notebook to test your model on images and videos.
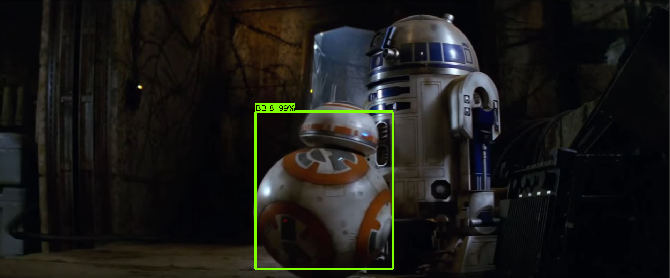
Detecting R2-D2 and BB-8
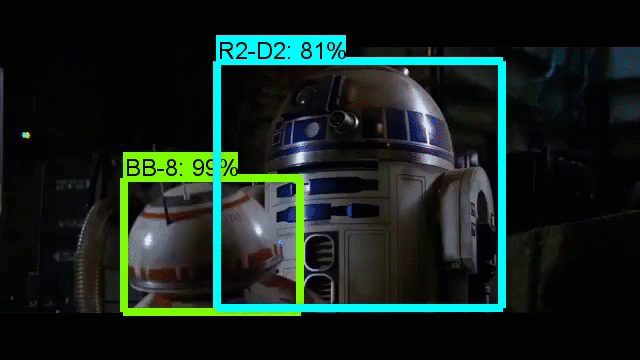
After I trained my model following the previous steps, I tested it in a sequence that didn’t contain any frames used for the training:
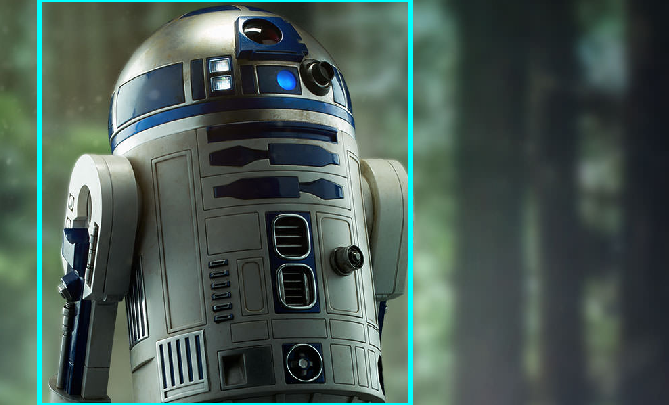
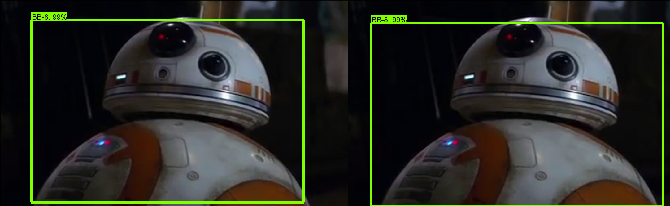
As we can see, the model gets confused quite easily, leading to some false positives (Harrison Ford getting detected as BB-8, but with low probability) and to missed detections (R2-D2 doesn’t get detected in some dark frames). All these failures are most likely a consequence of having such a small dataset and with images that are quite similar to each other. For example, the dataset doesn’t contain almost any image of the robots being small and part of the background. Hence, the video fails to detect them when they are not in a close-up or a medium shot. Nonetheless, the results obtained are the ones expected and we can see that the model works most of the times. Here are some final test images where the model succeed.
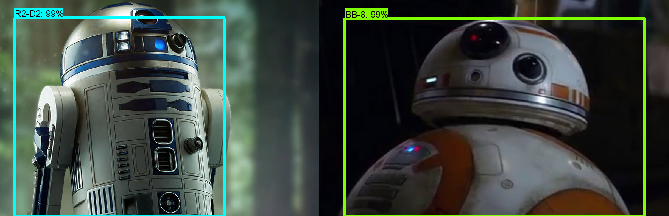
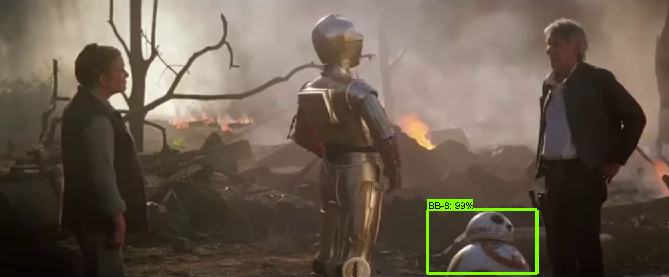
In this last one, I don’t know if I got a lucky frame or if in the video the model works worse for some reason.